How to migrate from WordPress to Payload: Part 1

Published On
How to migrate from WordPress to Payload
This tutorial will guide you through migrating your data from an existing WordPress project to Payload, a popular open-source headless CMS, and seen as a more flexible alternative to WordPress.

Why move from WordPress to Payload?

Like WordPress, Payload is fully open-source. However, it's written in TypeScript instead of PHP and is configured through code rather than a GUI. This approach speeds up setup and extension.

As a headless CMS, Payload allows you to choose your frontend framework. While Payload 3.0 is Next.js native, you can also use Vue, Astro, or any other framework. Payload supports extensive features, including custom file storage, database options, multiple collections, and authentication, offering the power of a backend framework.

Keep in mind, Payload is not a no-code or low-code tool; it's configured through code, providing immense flexibility.

WordPress structure vs. Payload

WordPressPayload
PagesPages Collection
Posts (with ACF Plugin)Posts Collection
Post AuthorsUsers Collection
Post CategoriesPost Categories Collection
Gutenberg BlocksPayload Blocks, added to pages & posts collection
MediaMedia collection, uploads enabled
MenusHeader / Footer Global

WordPress uses Pages and Posts with Gutenberg layout blocks. In Payload, we'll migrate these to individual “Collections”: Pages and Posts. Payload keeps it very simple. Collections are structured data groups, like pages, blog posts, or users. Globals are single-document collections.

We'll use the Users Collection for post authors, create a Blog Post Categories Collection, and utilize blocks similar to Gutenberg blocks for layout. We'll also create a Media Collection with uploads enabled. For navigation menus, we'll create header and footer globals.

What the migration will look like

Pages and Posts in WordPress will be migrated to Payload Collections. We'll create schemas for blocks like Cover, Paragraph (RichText), and Image blocks, and a block for Recent Blog Posts. Each block will have a schema defining its fields.

For example, a Cover block might have fields for heading and subheading, while an Image block would have an upload field linking to the Media Collection.

In addition to a block schema, we need to create a React component to display the block data. Since we're using NextJS 15, those components will be server components by default, but you can nest your own client components in them.

Remember that Payload is a headless CMS, so it provides the data, but you have to build the frontend blocks yourself. In part two of this tutorial, we'll explore how to do just that.

For this tutorial, we’ll focus on the creation of the schemas for the blocks.

WordPressPayload
Cover BlockCover Block
Paragraph BlockParagraph Block
Image BlockImage Block
Latest Blog Articles Block
Header Block
Footer Block

Existing WP project

We will start with three blocks in our “existing” WordPress project: Cover, Paragraph, and Image. For each, we’ll create corresponding blocks within Payload.

In WordPress, we might have an automated page that just shows our recent blog articles. What we do in Payload is create one of those blocks that fetches all recent posts, and then we can put that block anywhere we want.

In addition to that, we’ll have the Header block and the Footer block which will live globally on the entire page.

One recommendation I give is to manually migrate standard Pages such as home, about, etc. That will give you the opportunity to restructure and clean-up your project.

Since the majority of a website’s pages are auto-generated from posts, products, etc., you will save 90% of the effort. And the remaining 10% is worth doing manually.

Setting up Payload & Payload Collections

Install Payload in your local terminal:

  • npx create-payload-app@beta
  • Choose a project name (e.g., wp-migration).
  • Select a blank project template.
  • Choose MongoDB and configure the database. In this example, we’re just going to select a local database string, but you could also add a remote string for MongoDB Atlas.

Once your dependencies are installed, you can cd into your folder at cd wp-migration and open up VS Code (code .)

Once you’re in VS Code, you will be able to npm run dev to start the development server, and opening localhost:3000/admin in your browser should prompt you to create your first user in Payload.

And now we have an admin panel!

We’ll get started by creating Pages.ts under collections.

1
import { CollectionConfig } from 'payload'
2
3
export const Pages: CollectionConfig = {
4
slug: 'pages',
5
fields: [
6
{
7
name: 'name',
8
type: 'text',
9
label: 'Name',
10
required: true
11
},
12
{
13
name: 'slug',
14
type: 'text',
15
required: true,
16
label: 'Slug',
17
admin: {
18
position: 'sidebar'
19
}
20
},
21
{
22
name: 'layout',
23
label: 'Layout',
24
type: 'blocks',
25
blocks: [
26
// Define your blocks here
27
]
28
}
29
]
30
}

Then we’ll create BlogPosts.ts, which follows the same structure but includes authors.

1
import { CollectionConfig } from 'payload'
2
3
export const BlogPosts: CollectionConfig = {
4
slug: 'blogPosts',
5
fields: [
6
{
7
name: 'name',
8
type: 'text',
9
label: 'Name',
10
required: true
11
},
12
{
13
name: 'slug',
14
type: 'text',
15
label: 'Slug',
16
required: true,
17
admin: {
18
position: 'sidebar'
19
}
20
},
21
{
22
name: 'layout',
23
type: 'blocks',
24
label: 'Layout',
25
blocks: []
26
},
27
{
28
name: 'author',
29
type: 'relationship',
30
relationTo: 'users',
31
required: true,
32
label: 'Author'
33
}
34
]
35
}

And now we’ll create BlogCategories.ts.

1
import { CollectionConfig } from 'payload'
2
3
export const BlogCategories: CollectionConfig = {
4
slug: 'blogCategories',
5
fields: [
6
{
7
name: 'name',
8
type: 'text',
9
required: true,
10
label: 'Name'
11
}
12
]
13
}

Before we continue, we need to add them to our Payload config ('payload.config.ts').

1
import { mongooseAdapter } from '@payloadcms/db-mongodb'
2
import { lexicalEditor } from '@payloadcms/richtext-lexical'
3
import path from 'path'
4
import { buildConfig } from 'payload'
5
import { fileURLToPath } from 'url'
6
import sharp from 'sharp'
7
8
import Users from './collections/Users'
9
import Media from './collections/Media'
10
import Pages from './collections/Pages'
11
import BlogPosts from './collections/BlogPosts'
12
import BlogCategories from './collections/BlogCategories'
13
14
const filename = fileURLToPath(import.meta.url)
15
const dirname = path.dirname(filename)
16
17
export default buildConfig({
18
admin: {
19
user: Users.slug
20
},
21
collections: [
22
Users,
23
Media,
24
Pages,
25
BlogPosts,
26
BlogCategories
27
],
28
editor: lexicalEditor(),
29
secret: process.env.PAYLOAD_SECRET || '',
30
typescript: {
31
outputFile: path.resolve(dirname, 'payload-types.ts')
32
},
33
db: mongooseAdapter({
34
url: process.env.DATABASE_URL || ''
35
}),
36
sharp,
37
plugins: [
38
// storage-adapter-placeholder
39
],
40
})

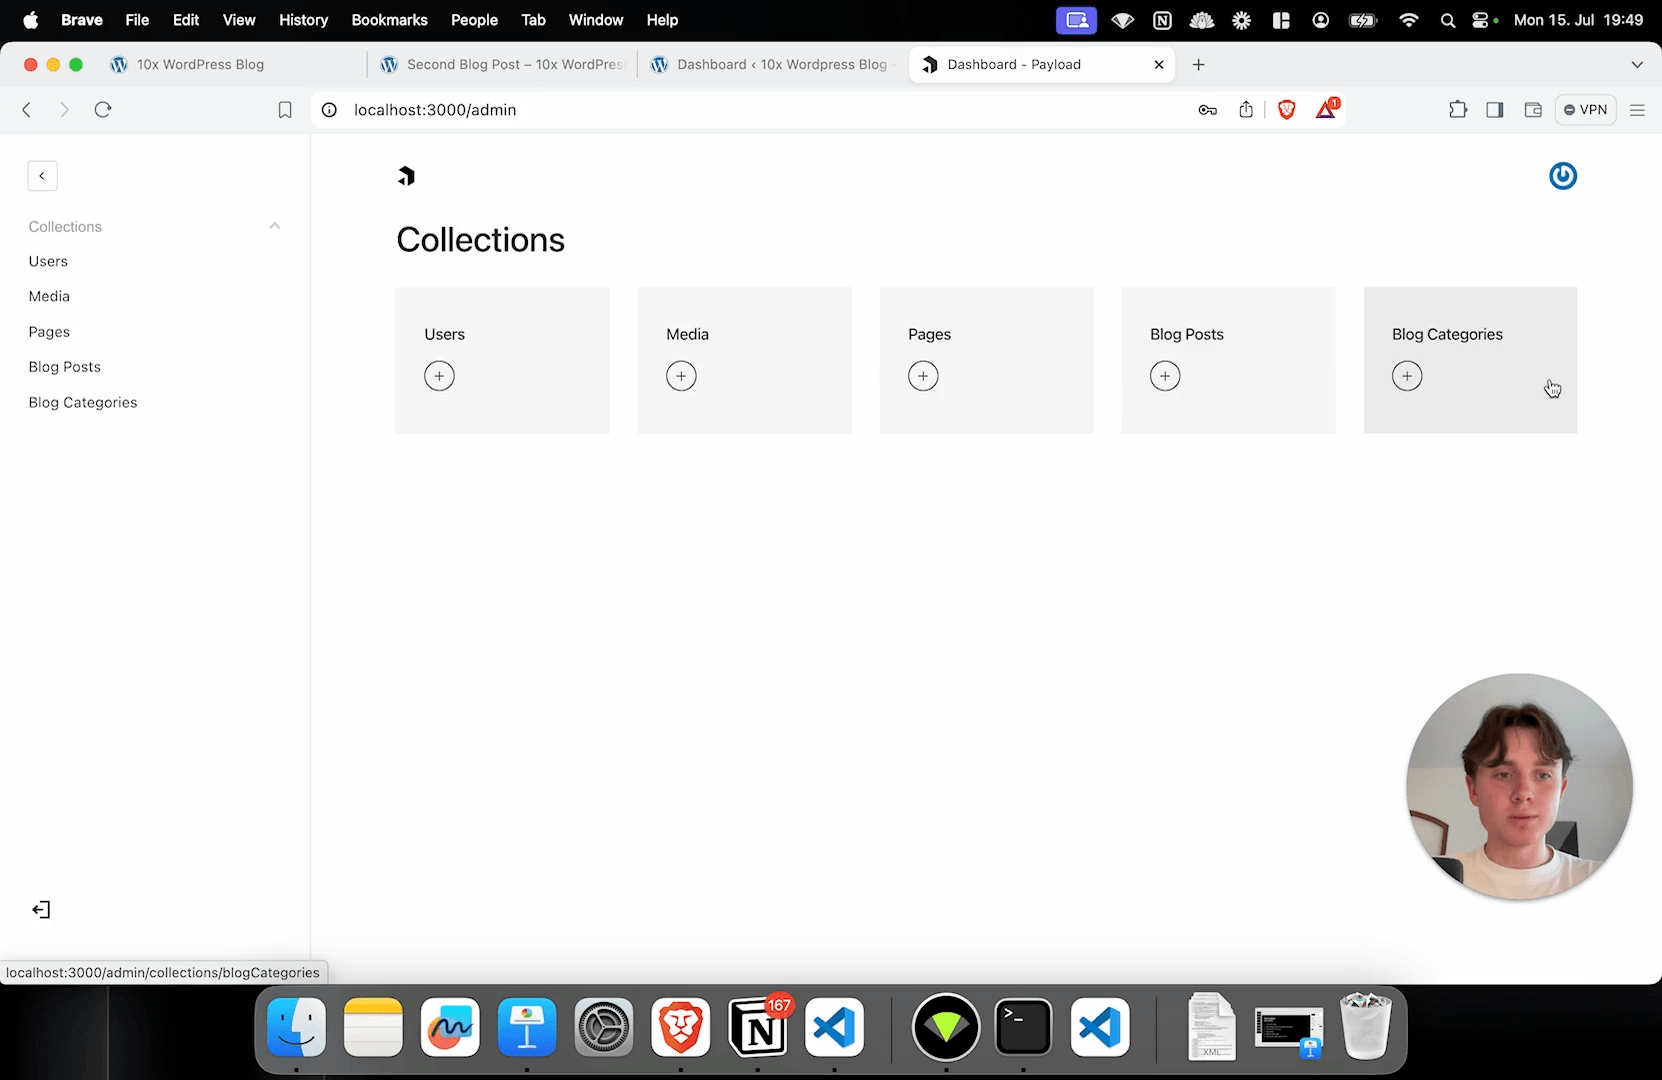
Your Payload dashboard should now include the following collections:

WordPress to Payload tutorial: Collections

After we’ve successfully created our Collections, we’ll continue with the creation of our blocks.

Creation of Payload blocks

Create a blocks folder inside the src directory and then create the block schemas. (Note: You can in theory put these wherever you want; we place them into their own subdirectory for less chaos).

Create a cover folder file within the blocks folder, and a schema.ts file within the cover folder.

1
import { Block } from 'payload';
2
3
export const Cover: Block = {
4
slug: 'cover',
5
fields: [
6
{
7
name: 'heading',
8
label: 'Heading',
9
type: 'richText',
10
required: true
11
},
12
{
13
name: 'subheading',
14
label: 'Subheading',
15
type: 'text',
16
}
17
]
18
}

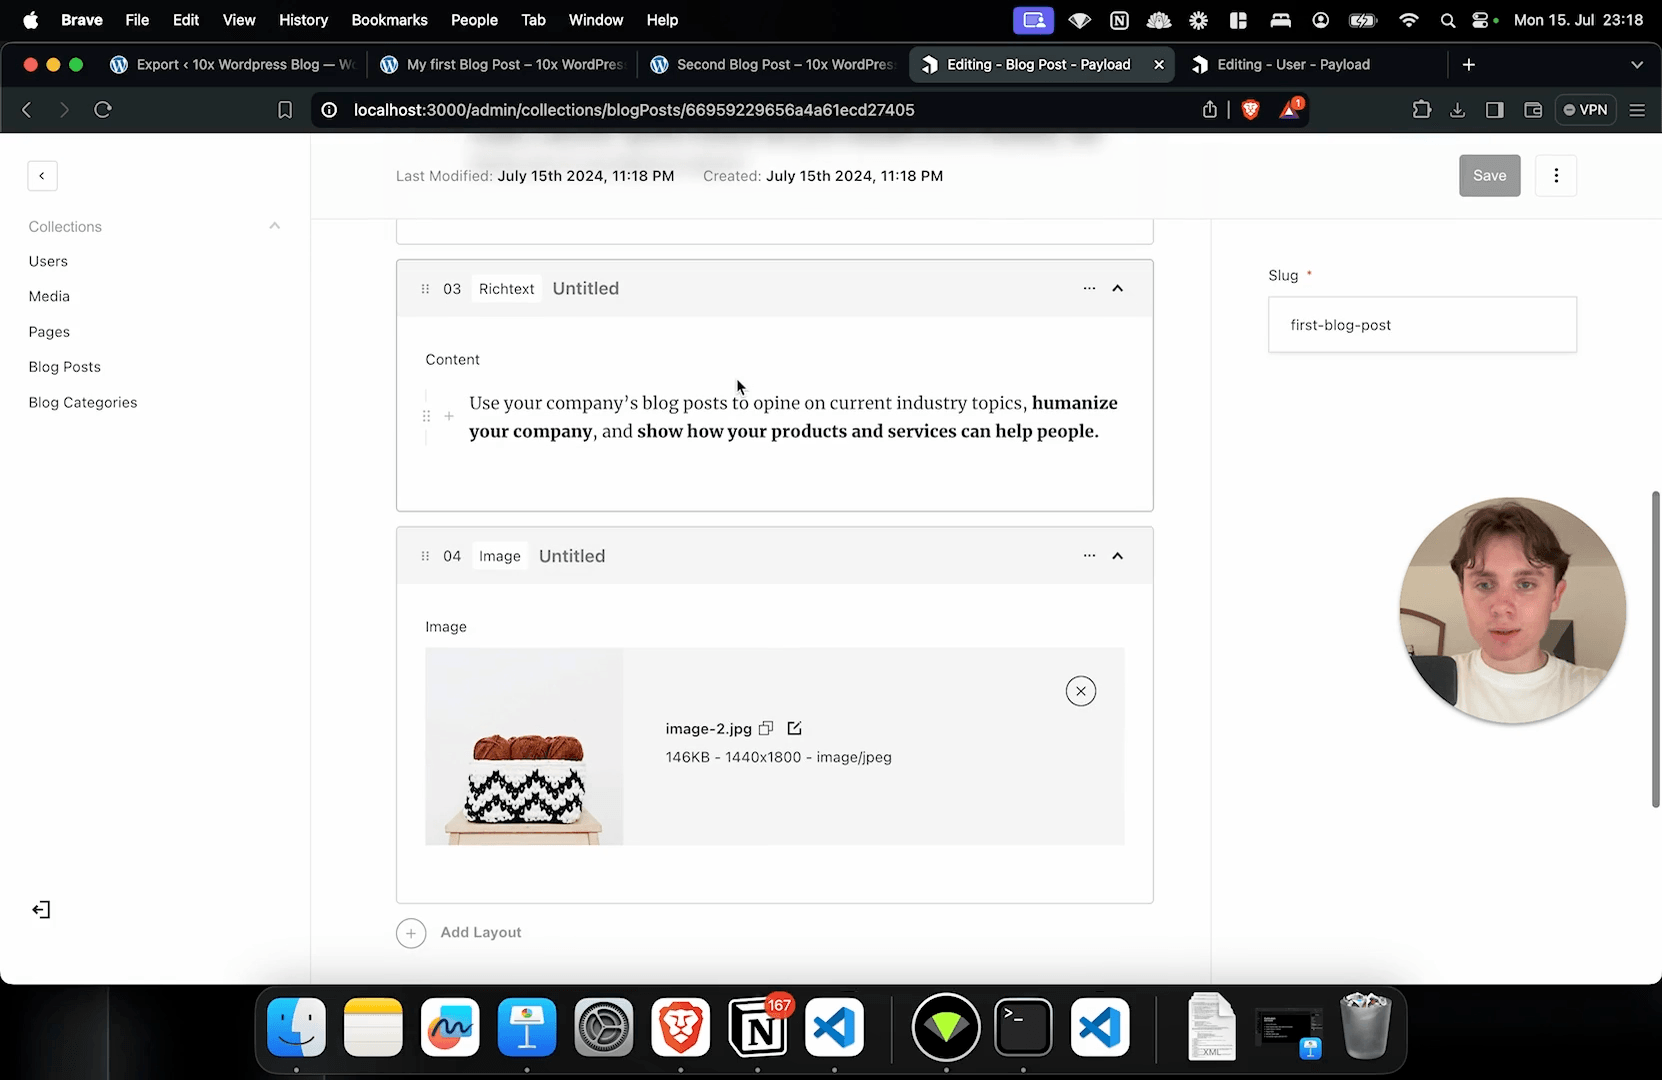
To continue, we'll paste in the other blocks, including the Image block (blocks > image > schema.ts), Richtext block (blocks > richtext > schema.ts), and recentBlogPosts block ( (blocks > recentBlogPosts > schema.ts).

For images, it’s a simple schema with one field with type: upload. This is similar to a relationship field but you can actually upload a new media element within this field—it links to a media collection where we have uploads enabled.

1
import { Block } from 'payload';
2
3
export const Image: Block = {
4
slug: 'image',
5
fields: [
6
{
7
name: 'image',
8
label: 'Image',
9
type: 'upload',
10
relationTo: 'media'
11
}
12
]
13
}

Then we have our richtext block, which is just the content field.

1
import { Block } from 'payload';
2
3
export const RichText: Block = {
4
slug: 'richtext',
5
fields: [
6
{
7
name: 'content',
8
label: 'Content',
9
type: 'richText'
10
}
11
]
12
}

And finally, the recentBlogPosts block; this is doesn’t have any fields at all because by default we just want to fetch the most recent blog posts. Optionally, you could add a special field that just specifies which posts the component should surface.

1
import { Block } from 'payload';
2
3
export const recentBlogPosts: Block = {
4
slug: 'recentBlogPosts',
5
fields: []
6
}
7

We’re now going to update Pages.ts and Posts.ts to include our new blocks.

Pages.ts:

1
import { CollectionConfig } from 'payload';
2
3
// In my tutorial video, the auto complete wasn’t working, so I added the following manually
4
import { Cover } from '@/blocks/cover/schema';
5
import { RecentBlogPosts } from '@/blocks/recentBlogPosts/schema';
6
import { RichText } from '@/blocks/richText/schema';
7
import { Image } from '@/blocks/image/schema';
8
9
export const Pages: CollectionConfig = {
10
slug: 'pages',
11
fields: [
12
{
13
name: 'name',
14
type: 'text',
15
label: 'Name',
16
required: true,
17
},
18
{
19
name: 'slug',
20
type: 'text',
21
label: 'Slug',
22
required: true,
23
admin: {
24
position: 'sidebar',
25
},
26
},
27
// Adding layout settings with blocks
28
{
29
name: 'layout',
30
type: 'blocks',
31
label: 'Layout',
32
blocks: [Cover, RecentBlogPosts, RichText, Image],
33
}
34
]
35
}

Under BlogPosts.ts, we do the same:

1
import { CollectionConfig } from 'payload';
2
3
// In my tutorial video, the auto complete wasn’t working, so I added the following manually
4
import { Cover } from '@/blocks/cover/schema';
5
import { RecentBlogPosts } from '@/blocks/recentBlogPosts/schema';
6
import { RichText } from '@/blocks/richText/schema';
7
import { Image } from '@/blocks/image/schema';
8
9
export const BlogPosts: CollectionConfig = {
10
slug: 'blogPosts',
11
fields: [
12
{
13
name: 'name',
14
type: 'text',
15
label: 'Name',
16
required: true,
17
},
18
{
19
name: 'slug',
20
type: 'text',
21
label: 'Slug',
22
required: true,
23
admin: {
24
position: 'sidebar',
25
},
26
},
27
// Adding layout settings with blocks
28
{
29
name: 'layout',
30
type: 'blocks',
31
label: 'Layout',
32
blocks: [Cover, RecentBlogPosts, RichText, Image],
33
},
34
{
35
name: 'author',
36
type: 'relationship',
37
relationTo: 'users',
38
required: true,
39
label: 'Author',
40
}
41
]
42
}

Now if we navigate back to our admin panel and create a new page, we should see all of our blocks added:

WordPress to Payload tutorial: Blocks created

Migrating your media to Payload

Next, we’re going to migrate media from your existing Wordpress website:

This involves going into your WordPress Dashboard, and navigating to: Tools > Export > Media > Download Export File.

Save as media.xml locally, and paste it into your VS Code project folder.

To migrate your media, we’re going to use a custom script (below) that accesses the local Payload API and creates media elements for us.

Note: What the exported XML contains is links to our resources in Wordpress—so it’s important that your site is still online and reachable so we can just fetch the data and upload it to Payload!

You will need the below mediaMigration.js and migrationWrapper.js files inside your project.

mediaMigration.js:

1
import fs from 'fs'
2
import { XMLParser } from "fast-xml-parser"
3
import mime from 'mime'
4
import { getPayload } from 'payload'
5
import { importConfig } from 'payload/node'
6
7
8
9
10
11
12
(async () => {
13
14
console.log('Starting migration')
15
const awaitedConfig = await importConfig('./src/payload.config.ts')
16
const payload = await getPayload({ config: awaitedConfig })
17
18
const xmlData = fs.readFileSync('./media.xml', 'utf8')
19
20
// const wpData = parse(xmlData)
21
const parser = new XMLParser()
22
const wpData = parser.parse(xmlData)
23
24
for (const mediaItem of wpData.rss.channel.item) {
25
console.log(mediaItem.guid)
26
27
// fetch file
28
const res = await fetch(mediaItem.guid);
29
if (!res.ok) {
30
console.log(`Skipping ${mediaItem.guid}, failed to fetch`)
31
continue;
32
}
33
const arrayBuffer = await res.arrayBuffer();
34
const buffer = Buffer.from(new Uint8Array(arrayBuffer))
35
36
await payload.create({
37
collection: 'media',
38
data: {
39
alt: mediaItem.title,
40
},
41
file: {
42
data: buffer,
43
mimetype: mime.getType(mediaItem.guid.split('?')[0].split('/').pop()),
44
name: mediaItem.guid.split('?')[0].split('/').pop(),
45
size: buffer.length,
46
},
47
})
48
}
49
50
})()

migrationWrapper.js:

1
import { importWithoutClientFiles } from "payload/node";
2
3
4
(async() => {
5
6
await importWithoutClientFiles('../../../../../../../migration.js')
7
})()

Install dependencies

You should install the following dependencies now. Although migrating media requires just XMLParser and Mime, the dependencies below are necessary for ultimately all content we’ll end up migrating over to Payload.

npm install cheerio
npm i @wordpress/block-serialization-default-parser
npm i mime
npm i fast-xml-parser
npm i lexical
npm i @lexical/html
npm install --save @lexical/headless
npm i jsdom

For details on this part of the project, especially if you need to manipulate the migration script for any particular use case, click here.

Now we’re going to call the migration wrapper by running node migrationWrapper.js, and begin to see the script migrating the data.

Upon restarting your server (npm run dev) and navigating to your admin panel's media section, you should now see the migrated media appear.

WordPress to Payload tutorial: Media migration

Moving Pages into Payload

We have just two pages in our sample WordPress project: Home and Blog.

In Payload, we’re going to:

  1. Create a page called “Home” and give it the slug index. Later on, we’ll replace this with an empty string.
  2. For the layout, add the Cover block, and copy and paste the HTML from WordPress into Payload.
  3. Add the Image block and choose the image from the library.
  4. Save.

Next, we'll do the Blog page:

  1. Name it "Recent Blog Posts", and the slug will be blog.
  2. The only layout block will be the “Recent Blog Post” block.
  3. Save.

Remember that this block could be on any page, including the Home page, to list all blog posts.

Migrating WordPress blog posts to Payload

Finally, we’ll migrate all of our Wordpress blog posts that use ACF (Advanced Custom Fields). Although in our example we only have two blog posts (in which case you’d just move those manually), it might be more common to have dozens if not hundreds or more.

This migration will be a bit more complex than the media migration.

We’ll use the following migration.js script to assist with moving our content.

First, we’ll paste in our migration script (below). We’ll call it migration.js.

1
import { getPayload } from "payload"
2
import { importConfig } from "payload/node"
3
import { parse } from '@wordpress/block-serialization-default-parser'
4
import fs from 'fs'
5
import { XMLParser } from "fast-xml-parser"
6
import mime from 'mime'
7
import cheerio from 'cheerio'
8
import path from 'path'
9
10
import { defaultEditorConfig, defaultEditorFeatures } from '@payloadcms/richtext-lexical' // <= make sure this package is installed
11
12
13
import { createHeadlessEditor } from '@lexical/headless' // <= make sure this package is installed
14
import {
15
getEnabledNodes,
16
sanitizeServerEditorConfig,
17
} from '@payloadcms/richtext-lexical'
18
19
import { $generateNodesFromDOM } from '@lexical/html'
20
import { $getRoot,$getSelection } from 'lexical'
21
import { JSDOM } from 'jsdom';
22
23
24
const categoryMap = {
25
"Knowledge Base": "66959006ded7f2eb40aa3e30",
26
"News": "66959001ded7f2eb40aa3e15",
27
};
28
29
30
(async () => {
31
console.log('Starting migration')
32
33
const awaitedConfig = await importConfig('./src/payload.config.ts')
34
const payload = await getPayload({ config: awaitedConfig })
35
const yourEditorConfig = defaultEditorConfig
36
37
const headlessEditor = createHeadlessEditor({
38
nodes: getEnabledNodes({
39
editorConfig: await sanitizeServerEditorConfig(yourEditorConfig, awaitedConfig),
40
}),
41
})
42
43
function getRootImageUrl(url) {
44
const urlObj = new URL(url);
45
const fileName = path.basename(urlObj.pathname);
46
const newFileName = fileName.replace(/-\d+x\d+(?=\.\w+$)/, ''); // Remove the size part
47
urlObj.pathname = path.join(path.dirname(urlObj.pathname), newFileName);
48
return urlObj.toString();
49
}
50
51
52
const xmlData = fs.readFileSync('./wp-data.xml', 'utf8')
53
54
// const wpData = parse(xmlData)
55
const parser = new XMLParser()
56
const wpData = parser.parse(xmlData)
57
58
// console.dir(wpData.rss.channel.item)
59
60
for (const blogPost of wpData.rss.channel.item) {
61
console.log(blogPost)
62
const parsedData = parse(blogPost['content:encoded'])
63
// console.log(parsedData)
64
65
66
// get Author ID
67
const authors = await payload.find({
68
collection: 'users',
69
where: {
70
slug: {
71
equals: blogPost['dc:creator']
72
}
73
}
74
})
75
const author = authors.docs[0]
76
77
const newBlogPostData = {
78
slug: blogPost['wp:post_name'],
79
author: author.id,
80
name: blogPost.title,
81
creationDate: new Date(blogPost.pubDate),
82
layout: [],
83
categories: Array.isArray(blogPost.category) ? blogPost.category.map(cat => categoryMap[cat]): [categoryMap[blogPost.category]],
84
}
85
86
for (const block of parsedData) {
87
88
89
if (block.blockName === 'core/image') {
90
91
// find image src with cheerio
92
const $ = cheerio.load(block.innerHTML)
93
const src = $('img').attr('src')
94
95
const alt = $('img').attr('alt')
96
const rootImageSrc = getRootImageUrl(src)
97
const imageName = rootImageSrc.split('/').pop()
98
console.log(`Found image with src: ${rootImageSrc}, alt: ${alt}`)
99
100
101
const images = await payload.find({
102
collection: 'media',
103
where: {
104
filename: {
105
equals: imageName
106
}
107
}
108
})
109
const image = images.docs[0]
110
111
newBlogPostData.layout.push({
112
blockType: 'image',
113
image: image.id,
114
})
115
116
}
117
118
if (block.blockName === 'core/paragraph' || block.blockName === 'core/heading') {
119
// const $ = cheerio.load(block.innerHTML)
120
// const text = $('p').text()
121
console.log(`Found paragraph with html: ${block.innerHTML}`)
122
123
headlessEditor.update(() => {
124
// In a headless environment you can use a package such as JSDom to parse the HTML string.
125
const dom = new JSDOM(block.innerHTML)
126
127
// Once you have the DOM instance it's easy to generate LexicalNodes.
128
const nodes = $generateNodesFromDOM(headlessEditor, dom.window.document)
129
130
// Select the root
131
$getRoot().select()
132
133
// Insert them at a selection.
134
const selection = $getSelection()
135
selection.insertNodes(nodes)
136
}, { discrete: true })
137
138
// Do this if you then want to get the editor JSON
139
const editorJSON = headlessEditor.getEditorState().toJSON()
140
141
// Clear Editor state
142
headlessEditor.update(() => {
143
const root = $getRoot();
144
root.clear();
145
146
}, { discrete: true });
147
148
149
newBlogPostData.layout.push({
150
blockType: 'richtext',
151
content: editorJSON,
152
})
153
}
154
155
// Migrate ACF
156
const customFieldData = blogPost['wp:postmeta'].find(meta => meta['wp:meta_key'] === 'test_field')['wp:meta_value']
157
console.log(customFieldData)
158
159
headlessEditor.update(() => {
160
161
// In a headless environment you can use a package such as JSDom to parse the HTML string.
162
const dom = new JSDOM(customFieldData)
163
164
// Once you have the DOM instance it's easy to generate LexicalNodes.
165
const nodes = $generateNodesFromDOM(headlessEditor, dom.window.document)
166
167
// Select the root
168
$getRoot().select()
169
170
// Insert them at a selection.
171
const selection = $getSelection()
172
selection.insertNodes(nodes)
173
}, { discrete: true })
174
175
// Do this if you then want to get the editor JSON
176
const editorJSON = headlessEditor.getEditorState().toJSON()
177
178
// Clear Editor state
179
headlessEditor.update(() => {
180
const root = $getRoot();
181
root.clear();
182
183
}, { discrete: true });
184
185
186
187
newBlogPostData.test_field = editorJSON
188
}
189
190
// Create Blog Article
191
console.log('creating new')
192
await payload.create({
193
collection: 'blogPosts',
194
data: newBlogPostData
195
})
196
197
}
198
199
})()

Next, to ensure the Wordpress users migrate correctly to Payload, we need to adjust the Users.ts collection and make the following changes:

1
import type { CollectionConfig } from 'payload';
2
3
export const Users: CollectionConfig = {
4
slug: 'users',
5
admin: {
6
useAsTitle: 'email',
7
},
8
auth: true,
9
fields: [
10
// Email added by default
11
// Add more fields as needed
12
{
13
name: 'slug', // We're adding this field
14
type: 'text',
15
required: true,
16
label: 'Slug',
17
admin: {
18
position: 'sidebar',
19
},
20
}
21
]
22
}
23

This change will allow the WordPress username to migrate and map accordingly to the slug. Although you can do this manually, this collection will still require a slug.

In the next step, we’ll create a categories section in our BlogPosts.ts file.

1
import { CollectionConfig } from 'payload';
2
3
export const BlogPosts: CollectionConfig = {
4
slug: 'blogPosts',
5
fields: [
6
{
7
name: 'name',
8
type: 'text',
9
label: 'Name',
10
required: true,
11
},
12
{
13
name: 'slug',
14
type: 'text',
15
label: 'Slug',
16
required: true,
17
admin: {
18
position: 'sidebar',
19
},
20
},
21
{
22
name: 'layout',
23
type: 'blocks',
24
label: 'Layout',
25
blocks: [],
26
},
27
{
28
name: 'author',
29
type: 'relationship',
30
relationTo: 'users',
31
required: true,
32
label: 'Author',
33
},
34
{
35
name: 'categories', // We're adding the below fields
36
type: ‘relationship’,
37
relationTo: ‘BlogCategories’,
38
label: ‘Categories’,
39
hasMany:true,
40
},
41
{
42
name: ‘test_field’,
43
type: ‘richText’’,
44
label: ‘Test Field’,
45
}
46
]
47
}
48

Next, we’ll create the Categories we need in Payload. According to our sample Wordpress project, they are named, “Knowledge Base” and “News.”

We’ll simply replicate each by clicking, “Blog Categories” and “Create new Blog Category” in the Payload admin panel.

Upon creation, Payload generates an ID for each.

In our migration.js script, we need to ensure each ID of a category is accounted for.

Example:

1
const categoryMap = {
2
"Knowledge Base": "enter-corresponding-ID",
3
"News": "corresponding-ID",
4
}

Finally, we need to export the blog posts from Wordpress: Tools > Export > Posts > Download Export File. Save as 'wp-data.xml' locally, and paste it into your project.

As mentioned earlier, before you run the migration script, ensure you have all the necessary dependencies installed!

For details on how the migration script and functions work, please consult the full YouTube video.

Run node migrationWrapper.js

That might take a bit of time depending on how many blog posts you have. Once it’s complete, navigate to your admin panel to confirm the blog posts and content — including images — have been migrated accordingly.

WordPress to Payload tutorial: Successful post migration

In a follow up tutorial, we’ll show you how to complete this project by building a frontend with Next.js.